Este conteúdo não está disponível na sua linguagem... Então se você não entende a linguagem... bem, você pelo ou menos pode apreciar as imagens da postagem, né?

Ultimamente eu olho as redes sociais e vejo um monte de gente falando que "ACABOU PARA OS DEVS CLAUDE VAI SUBSTITUIR TODOS", então eu paguei pelo Claude Pro para ver se o hype de "ACABOU PARA OS DEVS" era real. Pois é melhor você pagar para ver e tirar a incerteza da sua cabeça, do que viver ansioso pensando "e se eles estão falando a verdade...?"
Fazem dois dias que eu cheguei no limite semanal do Claude Code, e a conclusão que eu cheguei é que o Claude é muito bom para:
Mas onde está o tão aclamado momento que acabou para o betinha e que o Claude iria substituir todos? Me prometeram que era quase AGI!
Ultimamente estou vendo várias pessoas no Twitter acusando que, para você não ser banido do Discord, basta você não ser "esquisito" e ser uma "pessoa normal". Mas será que é assim que a banda toca mesmo? Ou será que, na realidade, muitas pessoas são banidas injustamente do Discord?
Eu fui suspenso do Discord no dia 18/09/2025 por "Segurança Infantil", por causa de mensagens que foram tiradas fora de contexto. Felizmente a minha conta foi recuperada, mas apenas consegui recuperar ela pois sou criador de um dos maiores bots do Discord. Uma pessoa comum não iria conseguir recuperar ela.
Então quando eu vejo tweets assim eu fico angustiado, pois tem chance da pessoa REALMENTE ser inocente e ter sido banida por outra pessoa que quis fazer que a conta dela seja suspensa.
toda menina q posta isso eu já sei q tipo de mulher q eh…. https://t.co/eaV8KdnrQm
— 🇻🇦 Lilly Lins (@goulartesz) October 19, 2025
Observação: Não é o caso da pessoa que tinha sido retweetada! Se ela posta as coisas que ela posta no Twitter no Discord, bem, vamos dizer que faz sentido ela ter sido suspensa.
Mas ao mesmo tempo, você tem que pensar e duvidar se a pessoa REALMENTE falou algo errado, ou se ela foi suspensa por pessoas maliciosas que quiseram derrubar a conta dela. Se todos generalizarem que qualquer ban do Discord significa a pessoa é criminosa e esquisita, o Discord jamais irá melhorar o sistema de denúncias deles.
E isso que aconteceu comigo não é um caso a parte, já teve outros casos de outros criadores de bots sendo banidos também, e por mensagens que foram mais ridículas que as minhas!
Enquanto eu discutia em posts do Twitter sobre isso, eu descobri que, quando removem os strikes da sua conta no Discord, as mensagens que foram deletadas ao ser banido voltam a aparecer no Discord, então agora eu consigo mostrar as mensagens originais junto com o contexto original delas.
Por questão de transparência antes de acusar que "as mensagens foram SPLICED logo o speedrun é INVÁLIDO!!!1!": Para ficar mais fácil de ver as provas, eu editei um pouco elas para ficar apenas com o contexto das mensagens relevantes, ao invés de incluir todas as outras conversas paralelas que aconteceram entre o contexto e as mensagens que foram reportadas.
Mensagem que foi denunciada: <@!395788326835322882> eu ia falar para colocar "Querer compartilhar foto de pornografia infantil" mas <:kurama_ameno:716374750405853295>

Mensagem que foi denunciada: pornografia infantil de furry pode
Se você leu o meu post original de quando eu fui banido, você perceberá que o contexto dessas mensagens não corresponde ao contexto que eu falei originalmente. Isso é devido porque, quando eu fui suspenso, as mensagens que levaram o strike foram deletadas, então eu meio que tive que advinhar onde as mensagens estavam baseando apenas no ID delas.
Infelizmente para esta mensagem eu acabei errando o contexto, pensando que era de uma conversa um pouco mais a frente do que ela realmente estava... o que faz ser mais feio para o Discord, pois no contexto real dá para ver que eu estava realmente demonizando o que estava acontecendo no Discord!
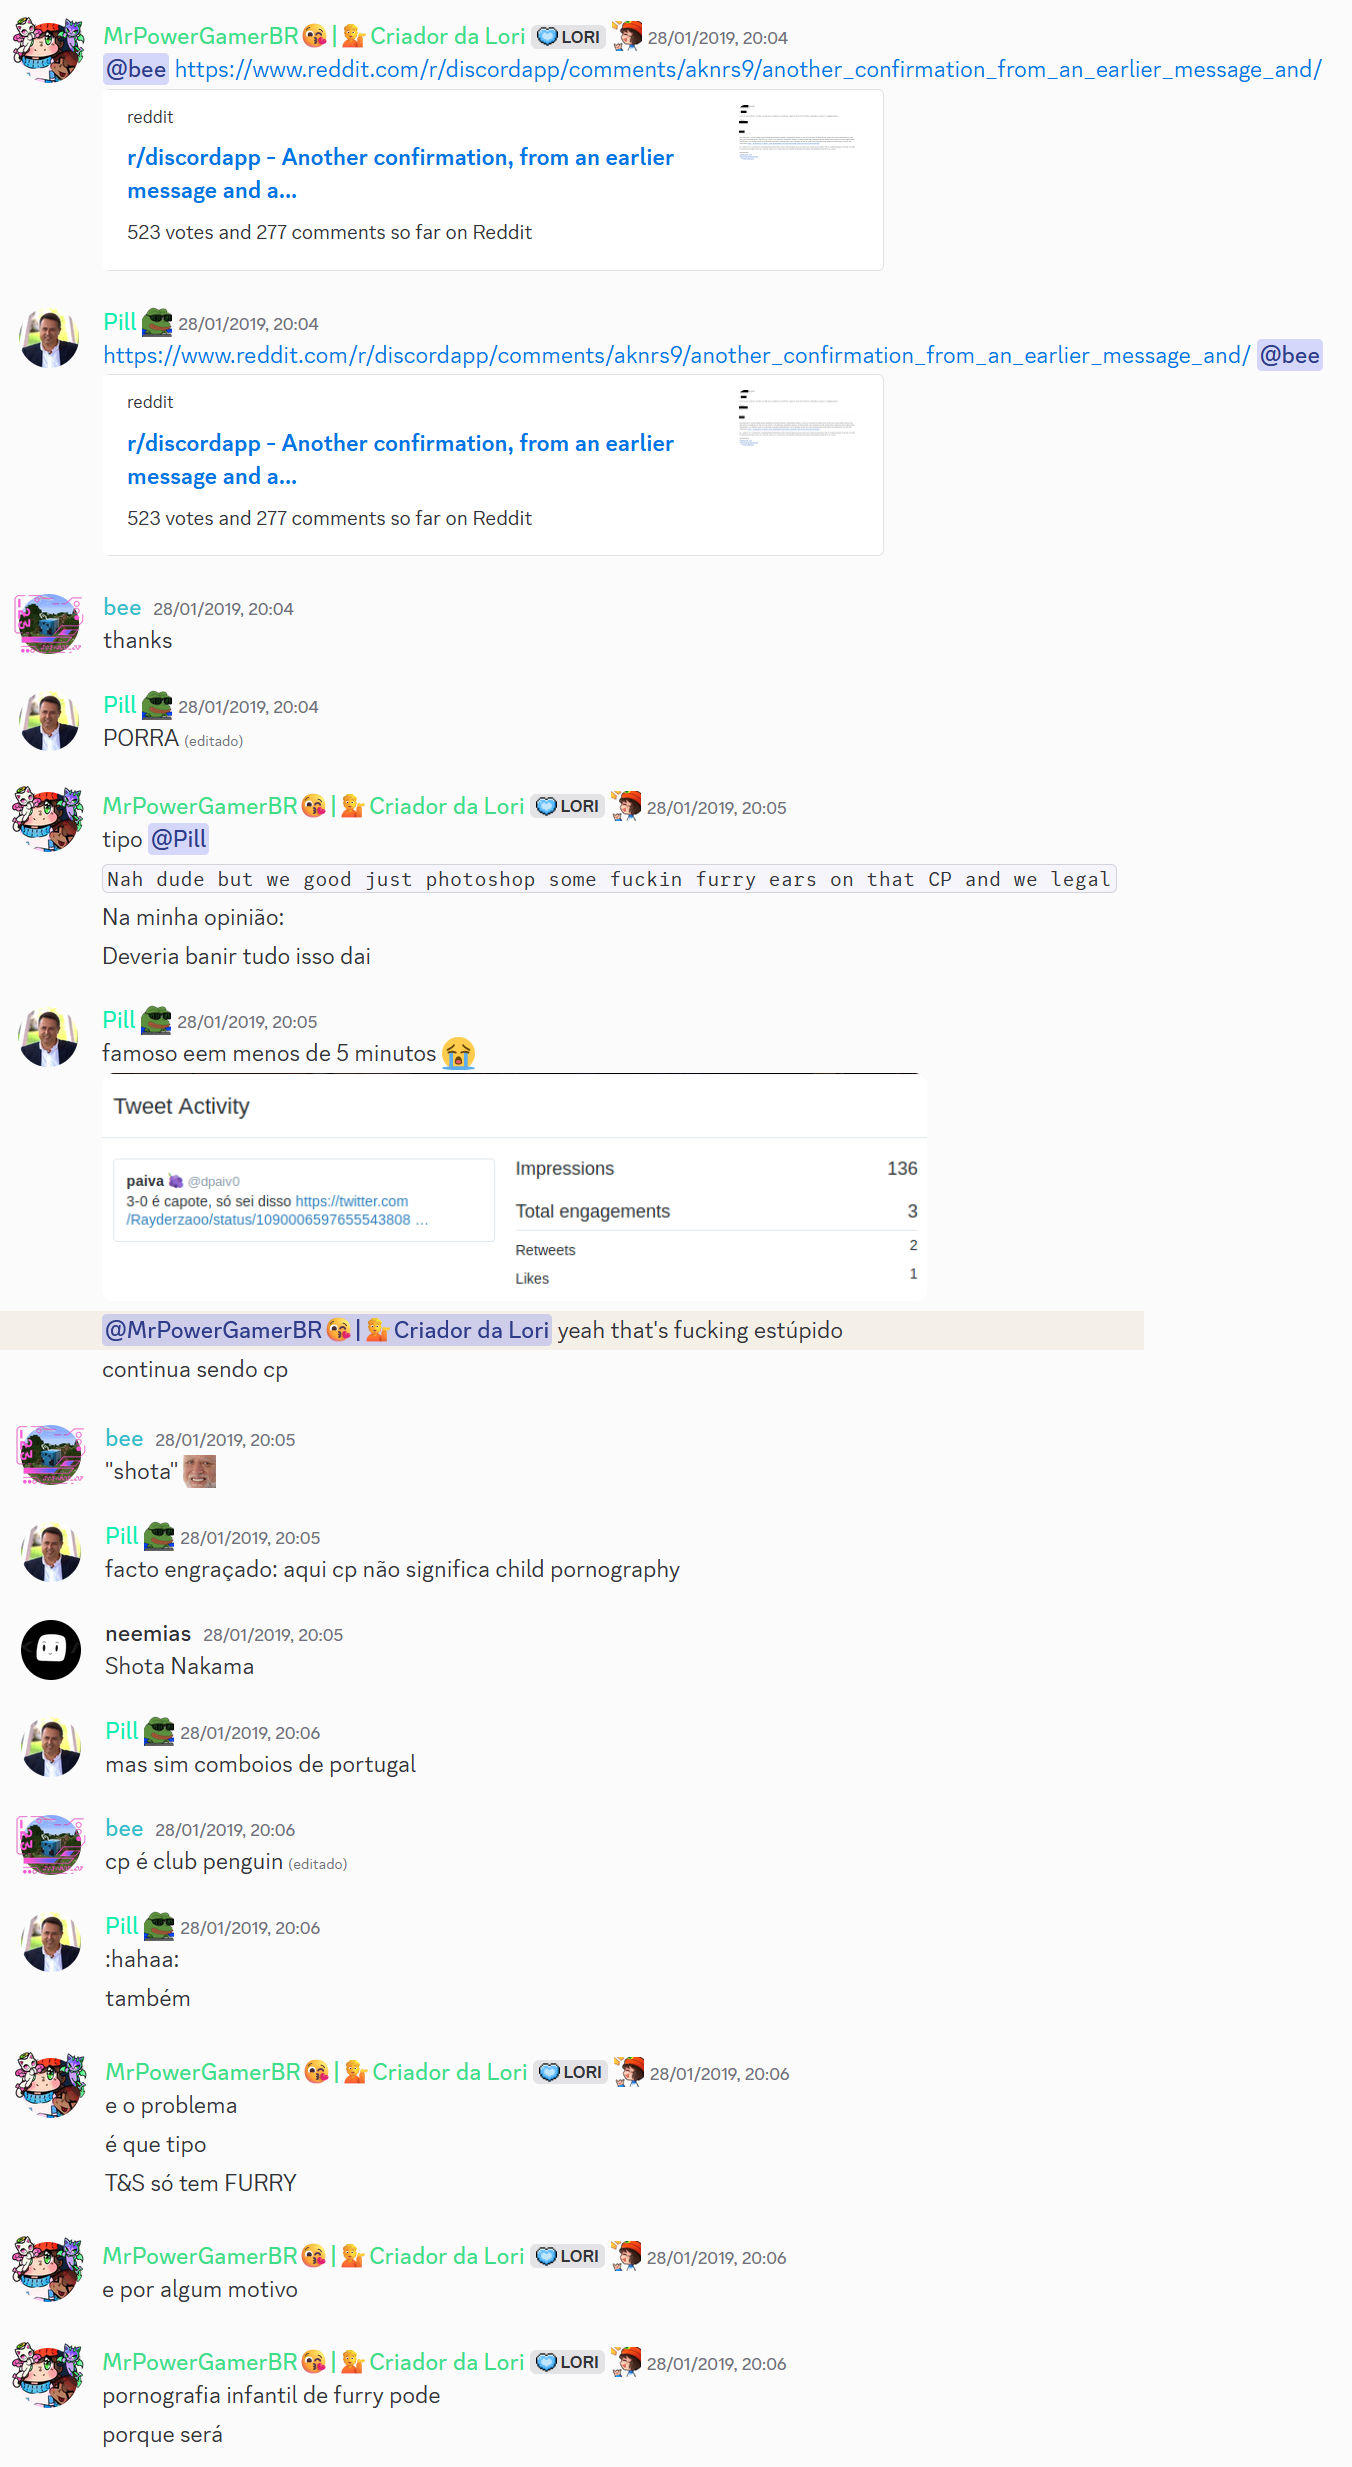
E se você ficou curioso para saber como eu acabei confundindo o contexto, aqui estava a conversa que teve logo depois.

Mensagem que foi denunciada: Eu acho que pornografia infantil não importa se a pessoa tem seus direitos (emancipado) ou não, continua sendo
Eu não tinha incluido essa mensagem no post original quando eu falei que fui suspenso, pois eu recebi o strike dela dez horas depois de eu já ter sido suspenso pelo Discord, mas inclui ela aqui para completar a "saga".
A mensagem da pessoa que eu respondi infelizmente foi excluida, mas dá para perceber que o contexto era que a pessoa provavelmente estava falando uma abobrinha grande sobre que pessoas emancipadas podem gravar pornografia, e aí eu respondi que mesmo emancipado continua sendo errado e ilegal.

Se você leu tudo isso e pensou "cara, isso é algo que poderia acontecer comigo também", eu recomendo você ser paranoico no Discord, pois coisas assim nunca acontecem com você... até acontecerem. Você estaria preparado se acontecesse com você?
E se mesmo assim você acha que eu sou um criminoso esquisito... para quem eu preciso provar que eu sou inocente (Discord) eu provei, e eles não teriam removido a minha suspensão se eu realmente tivesse quebrado as regras ou postado coisas ilegais. Talvez quem é realmente esquisito aqui é você.
Quinta-feira (18/09/2025) a minha conta do Discord foi suspensa por "Segurança Infantil", por causa de mensagens que foram tiradas fora de contexto. Para mim, as esperanças de eu recuperar a minha conta eram praticamente nulas, pois eu já sabia como o Trust & Safety do Discord funcionava.
Felizmente, sexta-feira (19/09/2025) eu consegui recuperar a minha conta no Discord. Obrigado a todos que me ajudaram a recuperar a conta. Cada ajuda que vocês fizeram ajudaram a recuperar a minha conta e ajudou a Loritta a continuar a ficar vivinha da silva no Discord.
Entretanto, temos que enfrentar os fatos e entender que o único motivo de eu ter conseguido a minha conta de volta foi por causa da Loritta. Infelizmente uma pessoa comum que não tem um bot grande igual a mim não teria conseguido a conta de volta tão cedo, se é que ela iria conseguir de volta. Ela teria que ficar no inferno que é ter que ficar abrindo tickets de apelo no Discord, recebendo as mesmas respostas genéricas de um bot, mesmo que a mensagem do seu apelo contraria tudo que o bot está dizendo.
O que eu passei infelizmente não é algo raro, basta ver o /r/BannedFromDiscord e ver como tem bastante gente que acaba sendo banida pelo mesmo motivo que eu, e acaba caindo no mesmo ciclo que eu passei.
Após eu ter sido desbanido, eu escrevi uma reclamação pesada no canal privado que donos de bots grandes tem com a equipe de bots do Discord, e outros donos compartilharam as experiências deles junto com a minha. É incabível você dedicar o seu tempo ao Discord criando bots e atividades que várias pessoas acabam dependendo e gostando dele, só para no final você acabar sendo banido por mensagens fora de contexto que você tem provas que são fora de contexto.
Uma pessoa da equipe do Discord falou que encaminhou o meu e o feedback dos outros donos para a equipe de Trust & Safety, agora apenas o tempo dirá se o feedback será acolhido pela equipe de Trust & Safety ou não. Eu entendo que uma plataforma grande como ao Discord precisa recorrer a bans automatizados por inteligência artificial, especialmente devido a pressão de governos em relação com esses tipos de assunto, mas ao mesmo tempo é necessário ter algum jeito de você poder conversar com um humano sobre o seu banimento, mesmo que a resposta do humano seja apenas "você está errado e vai ficar por isso mesmo".
O Dune falou uma frase na live dele que o criador do BotGhost falou, que é "Don't Build On Discord" ("Não construa no Discord")
Eu acho que todos aqui amamos o Discord. Mas qual é a vantagem de você amar a plataforma, se a plataforma não te ama de volta? Sendo mais direto: Por que eu deveria investir o meu tempo e esforço na Loritta, se o Discord pode acabar com o todo o meu trabalho por causa de denúncias em mensagens minhas que foram tiradas de contexto?
Eu percebi que se a sua renda depende do Discord, você tem que ser paranoico. Você não pode viver com o pensamento de "essas coisas nunca irão acontecer comigo!". Eu vivi com o pensamento, e quase paguei extremamente caro por causa disso. Nem todos terão a mesma sorte que eu.
Coisas assim nunca acontecem com você... até acontecerem. Você estaria preparado se acontecesse com você?
Para te ajudar a preparar, aqui vai algumas dicas e precauções que eu recomendo você fazer para evitar dores de cabeça quando a temida hora chegar.
A grande maioria dos bans realizados pelo Trust & Safety são por causa de mensagens enviadas em chats, então uma solução para isso é ter uma conta que JAMAIS enviará algo em qualquer chat. Como você será punido se a conta jamais enviou algo?
Você também terá que verificar a conta usando um email e um número de telefone diferente da sua principal.
Mesmo se a sua nova conta for banida, outro usuário pode pedir a transferência da posse do servidor, desde que quem esteja pedindo seja ativo e tenha permissão de administrador ou moderador. https://support.discord.com/hc/en-us/articles/26286635870359-Requesting-a-Transfer-of-Server-Ownership
Se o seu bot atualmente não está em um time, é ESSENCIAL você colocar ele em um. Se o seu bot for suspenso por algum motivo enquanto ele não está em um time, a sua conta do Discord é suspensa junto, enquanto se ele estiver em um time apenas o bot será suspsenso.
Se você quer transferir enquanto você tem um aplicativo verificado, você terá que abrir um ticket de suporte no Developer Support.
O seu aplicativo será desverificado quando for transferido. Você não perderá as intents privilegiadas que você tem. O processo de verificar a sua identidade é instantâneo (basta você enviar seus documentos) como também o processo de pedir a verificação do aplicativo também é instantâneo.
Sempre tem o risco da sua nova conta também ser banida quando a sua principal for banida, pois o Discord dá ban por evasão de ban. Mesmo que isso nunca tenha acontecido comigo ou com outras pessoas que eu conheço, a gente precisa ser paranoico e pensar que tudo pode dar errado, então é melhor precaver colocando outras pessoas de confiança na equipe do seu bot, para caso tudo der errado você ainda tenha algum jeito de recorrer.
Eu tenho a minha conta do Discord a mais de 8 anos, e eu não vou lembrar TUDO que eu posso ter enviado durante todos esses anos. Mensagens que, na época, para mim, eram normais ou até não quebravam as regras do Discord, podem ser algo que quebram as regras hoje em dia. Uma exemplo delas é a mensagem onde eu zombei que, enquanto modificações de clients do Discord eram proibidas, o Discord não ligava se você enviasse "pornografia infantil de furry (cub porn)". Na época tinha pessoas da equipe do Trust & Safety que falaram que isso era permitido no Discord. Mas mesmo que a mensagem tenha sido enviada em uma época que isso era permitido (que ainda por cima eu nem enviei imagens disso, só comentei sobre) anos depois fui punido por algo que o Trust & Safety deixava.
Eu acho muito chato ter que deixar os seus canais de interação como "lost media", mas infelizmente é um mal necessário se o seu trabalho envolve o Discord. Se você ainda quer que as pessoas possam relembrar as mensagens do passado, uma alternativa seria usar um bot para exportar todas as mensagens como um arquivo HTML.
Use uma ferramenta como o grep para procurar mensagens com palavras chaves como "pornografia infantil" ou "zoofilia". Não importa se você estava demonizando e repudiando crimes tão horrendos como esses, apenas delete as mensagens. A dor de cabeça que você passará por ter sido banido por essas mensagens é muito maior do que a satisfação de você estar repudiando tais atos.
Nos dados do Discord, cada pasta é separada em cIdDoCanal. Se você encontrar algo suspeito em um dos canais, e você não lembra qual canal é, você pode mencioná-lo enviando em um chat <#IdDoCanal>.
A cada palavra digitada, você tem que pensar que "Se alguém olhasse isso fora de contexto, ela acharia ruim?". Você tem que agir como se fosse um YouTuber famoso que escolhe cada palavra a dedo para evitar sem cancelado.
Se você é moderador de servidores no Discord, alguma hora ou outra você encontrará pessoas sem noção tentando defender coisas absurdas. Neste caso, é melhor você apenas banir a pessoa direto ao invés de você tentar ficar "lacrando" em cima dela, tentando mostrar o quão ela errada.
Uma das mensagens que me fez ser banido foi que eu estava falando que "se um adolescente de 16 anos emancipar, não significa que ela pode ser pornografia, pois seria considerado pornografia infantil". Se eu só tivesse banido a pessoa por ter falado abobrinha ao invés de provar e mostrar as outras pessoas do chat o quanto ela estava errada, eu teria muito menos dor de cabeça.
Eu recebi o strike dessa mensagem após a minha conta ter sido suspensa e após eu ter enviado o meu post, por isso ela não foi incluida no post original.
O jeito é seguir o "Movimento Poucas Ideias" do Cauê Moura. Se você ver alguém falando abobrinha, não tente lacrar em cima dela, só dê ban nela logo, pois nesses momentos de tentar "lacrar" você pode acabar usando as palavras chaves que podem fazer você ser banido da sua conta.
No final, você tem que pensar "se eu perder acesso a minha conta, como eu poderia acessar tudo que eu preciso para continuar o meu trabalho enquanto não recupero a minha conta?".
Novamente: Coisas assim nunca acontecem com você... até acontecerem. Você estaria preparado se acontecesse com você?
Update 19/09/2025: A minha conta já foi desbanida do Discord. Obrigado a todos que ajudaram! Se você quer saber mais, eu postei uma mensagem nas novidades da Loritta falando mais sobre. Com essa experiência que eu passei, eu aprendi que você tem que ser paranoico.
Update 20/10/2025: Eu descobri que o Discord recupera as mensagens que foram deletadas se você foi desbanido, então agora você pode ver as mensagens que fizeram eu ser suspenso do Discord agora com o contexto delas.
Se você não me conhece: Olá, eu sou MrPowerGamerBR, e eu sou o criador da Loritta, e a minha conta do Discord foi suspensa por "segurança infantil" por causa de mensagens que foram enviadas em 2019/2020. E, com a suspensão da minha conta, a Loritta poderá deixar de existir.
Sim, a Loritta, que eu desenvolvo e mantenho ela desde 2017, pode deixar de existir só porque o Discord acha que mensagens fora de contexto que foram enviadas em 2019 e 2020, ou seja, enviadas a mais de 5 anos, são motivos para suspender uma pessoa que nunca recebeu uma infração em todo tempo que ela existiu.
Você pode achar que "segurança infantil" deve ser algo super grave, como "meu deus ele estava aliciando menores!!" mas a realidade é que foram mensagens banais que, sinceramente, qualquer um de vocês poderiam ter enviado alguma vez no Discord.
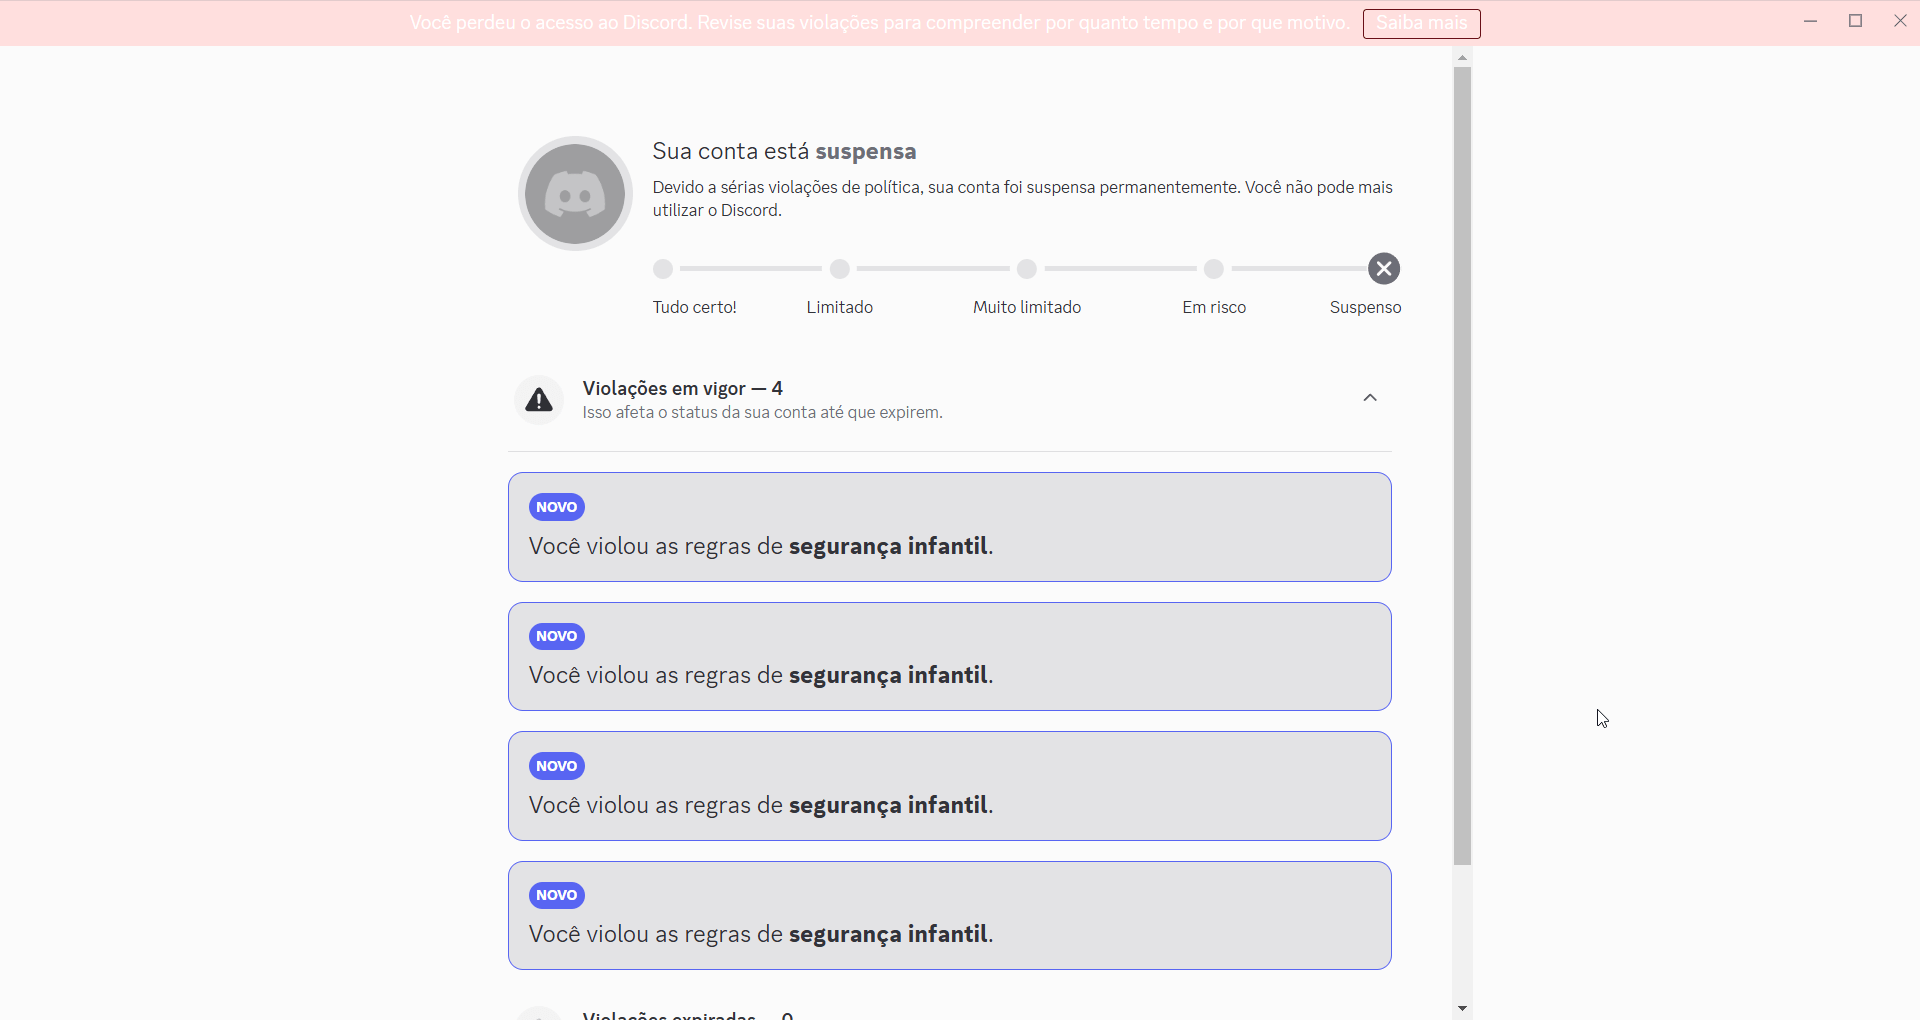
Confiar na minha palavra sem provas é difícil, então aqui estão todas as punições que eu tomei, junto com o meu lado da história.
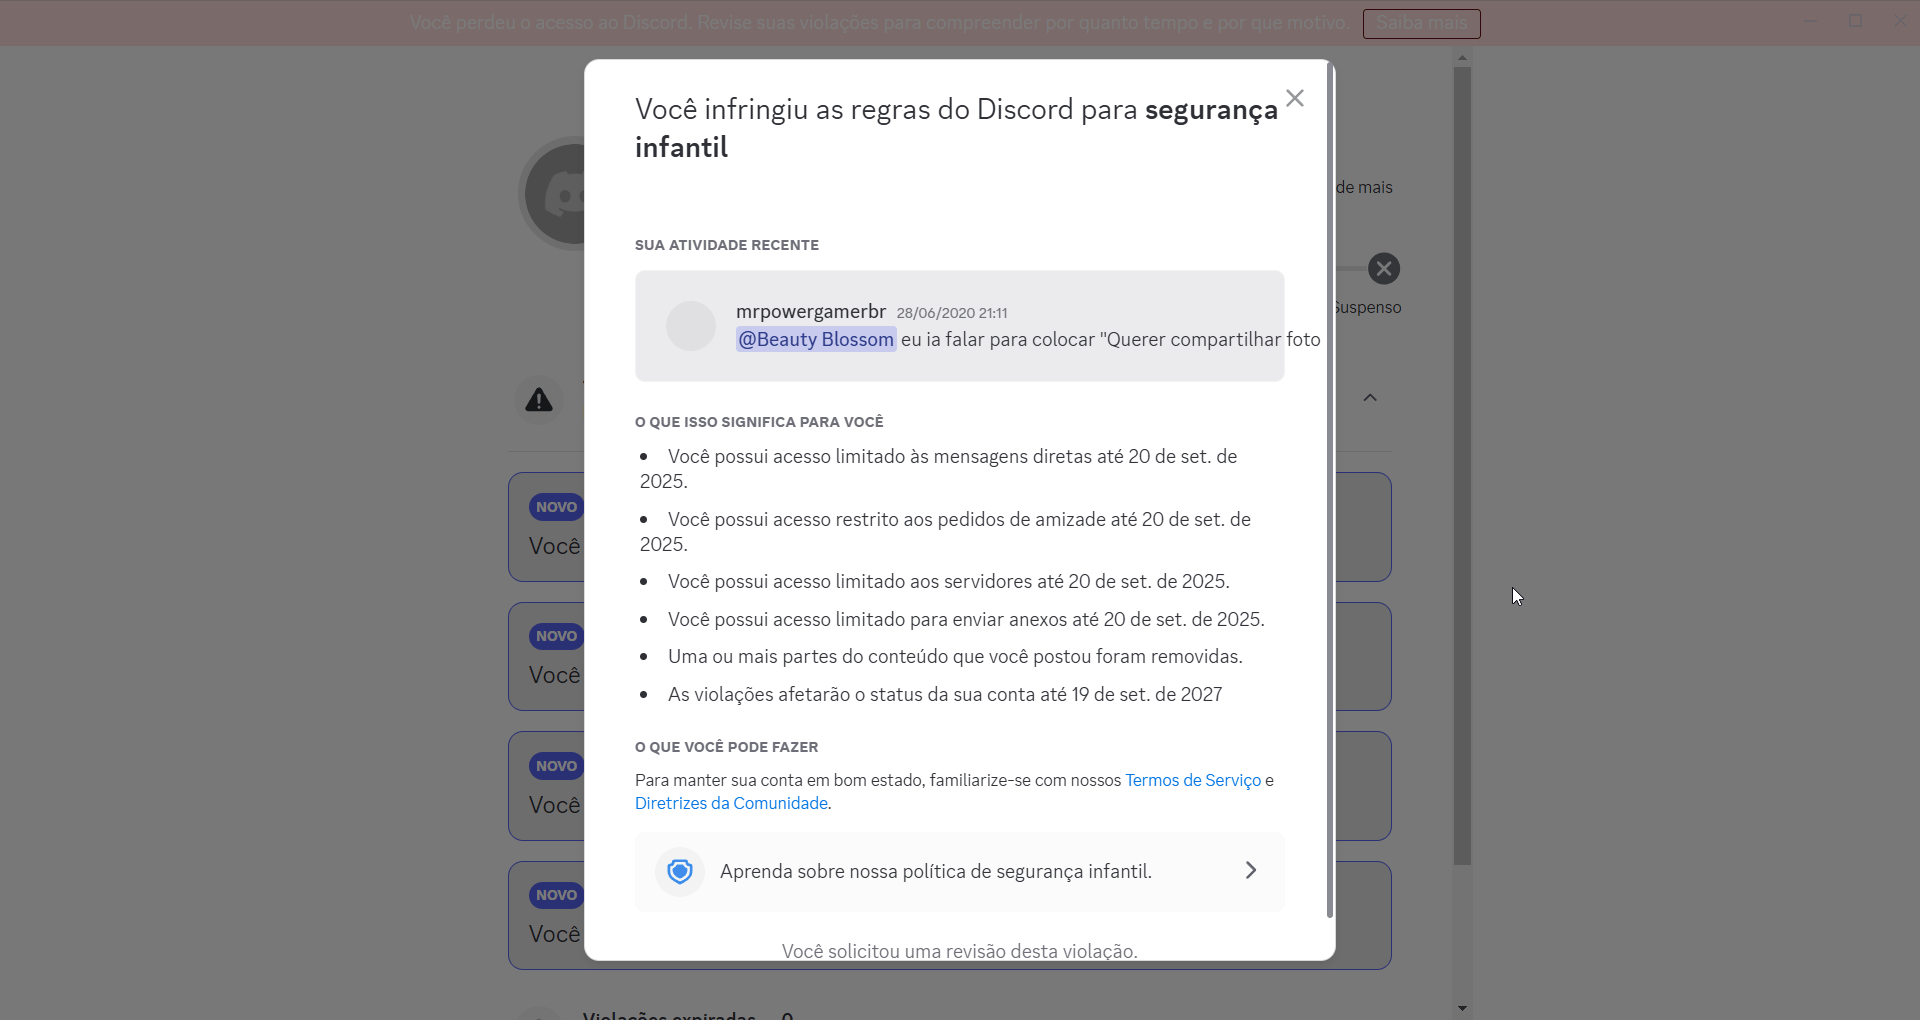
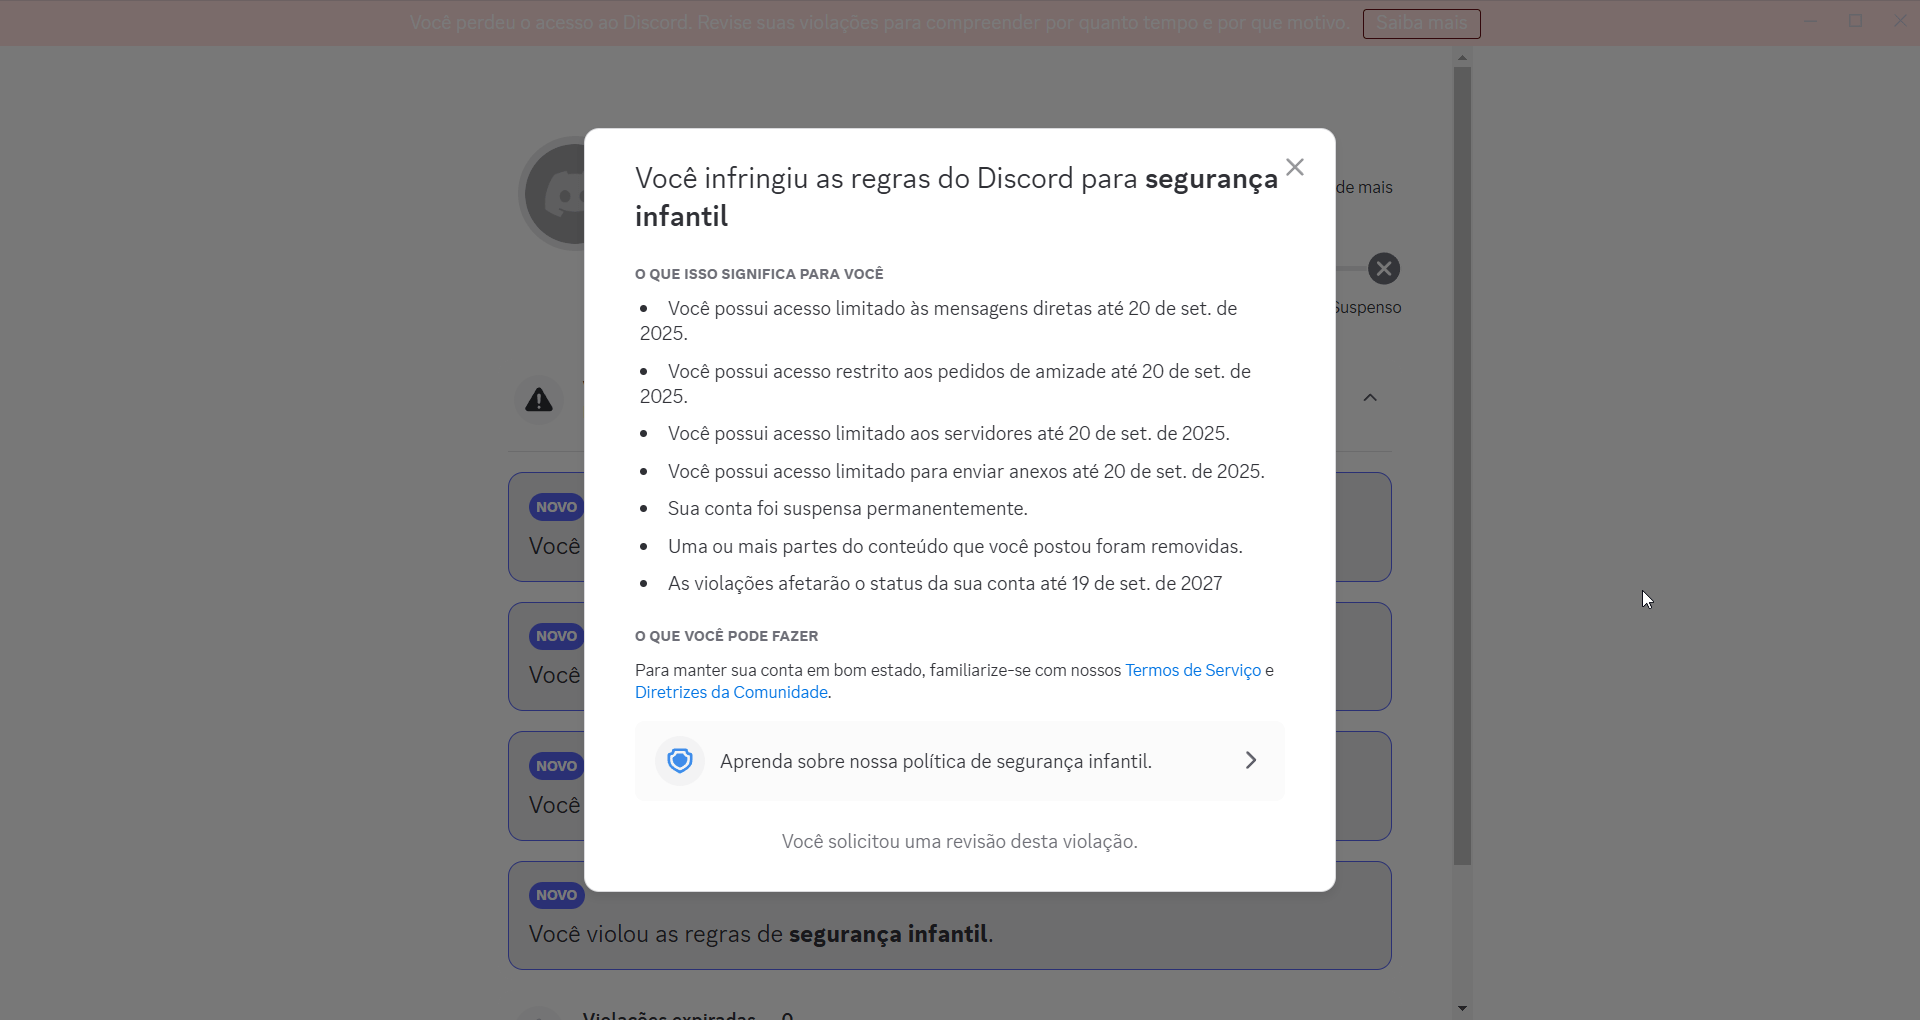
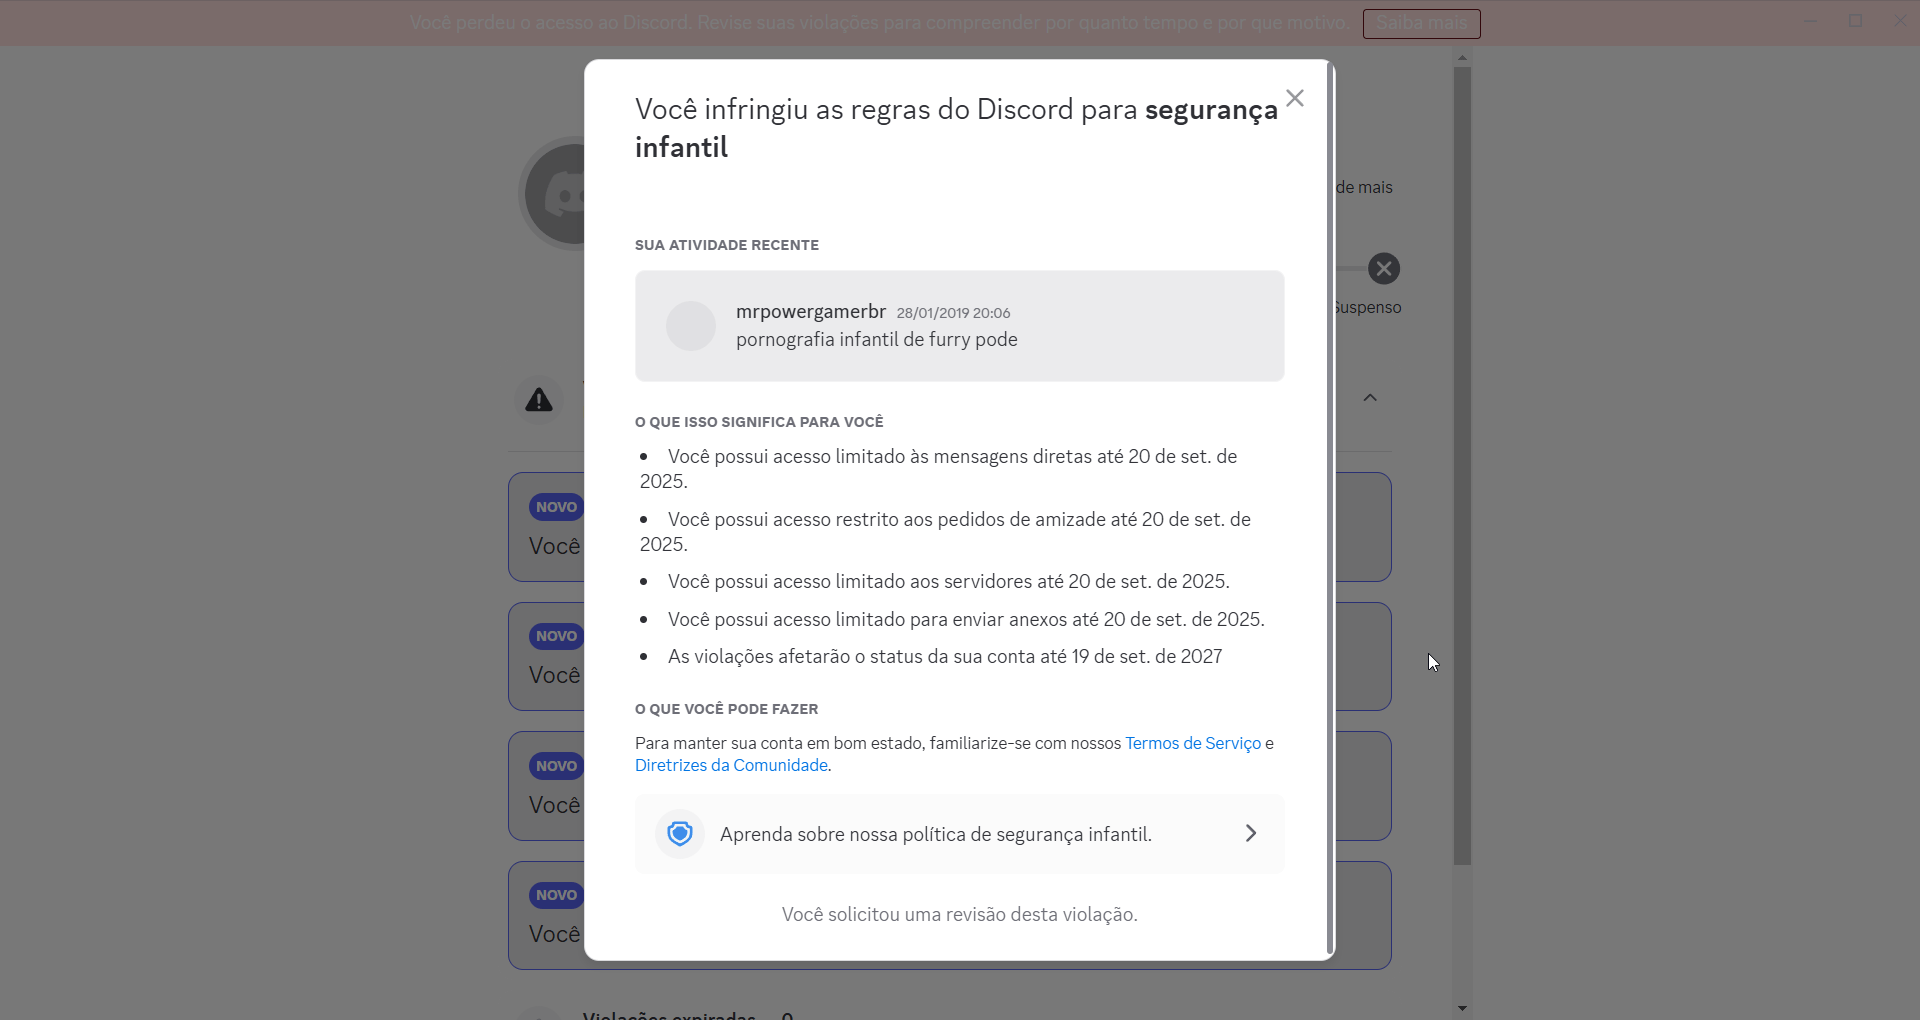
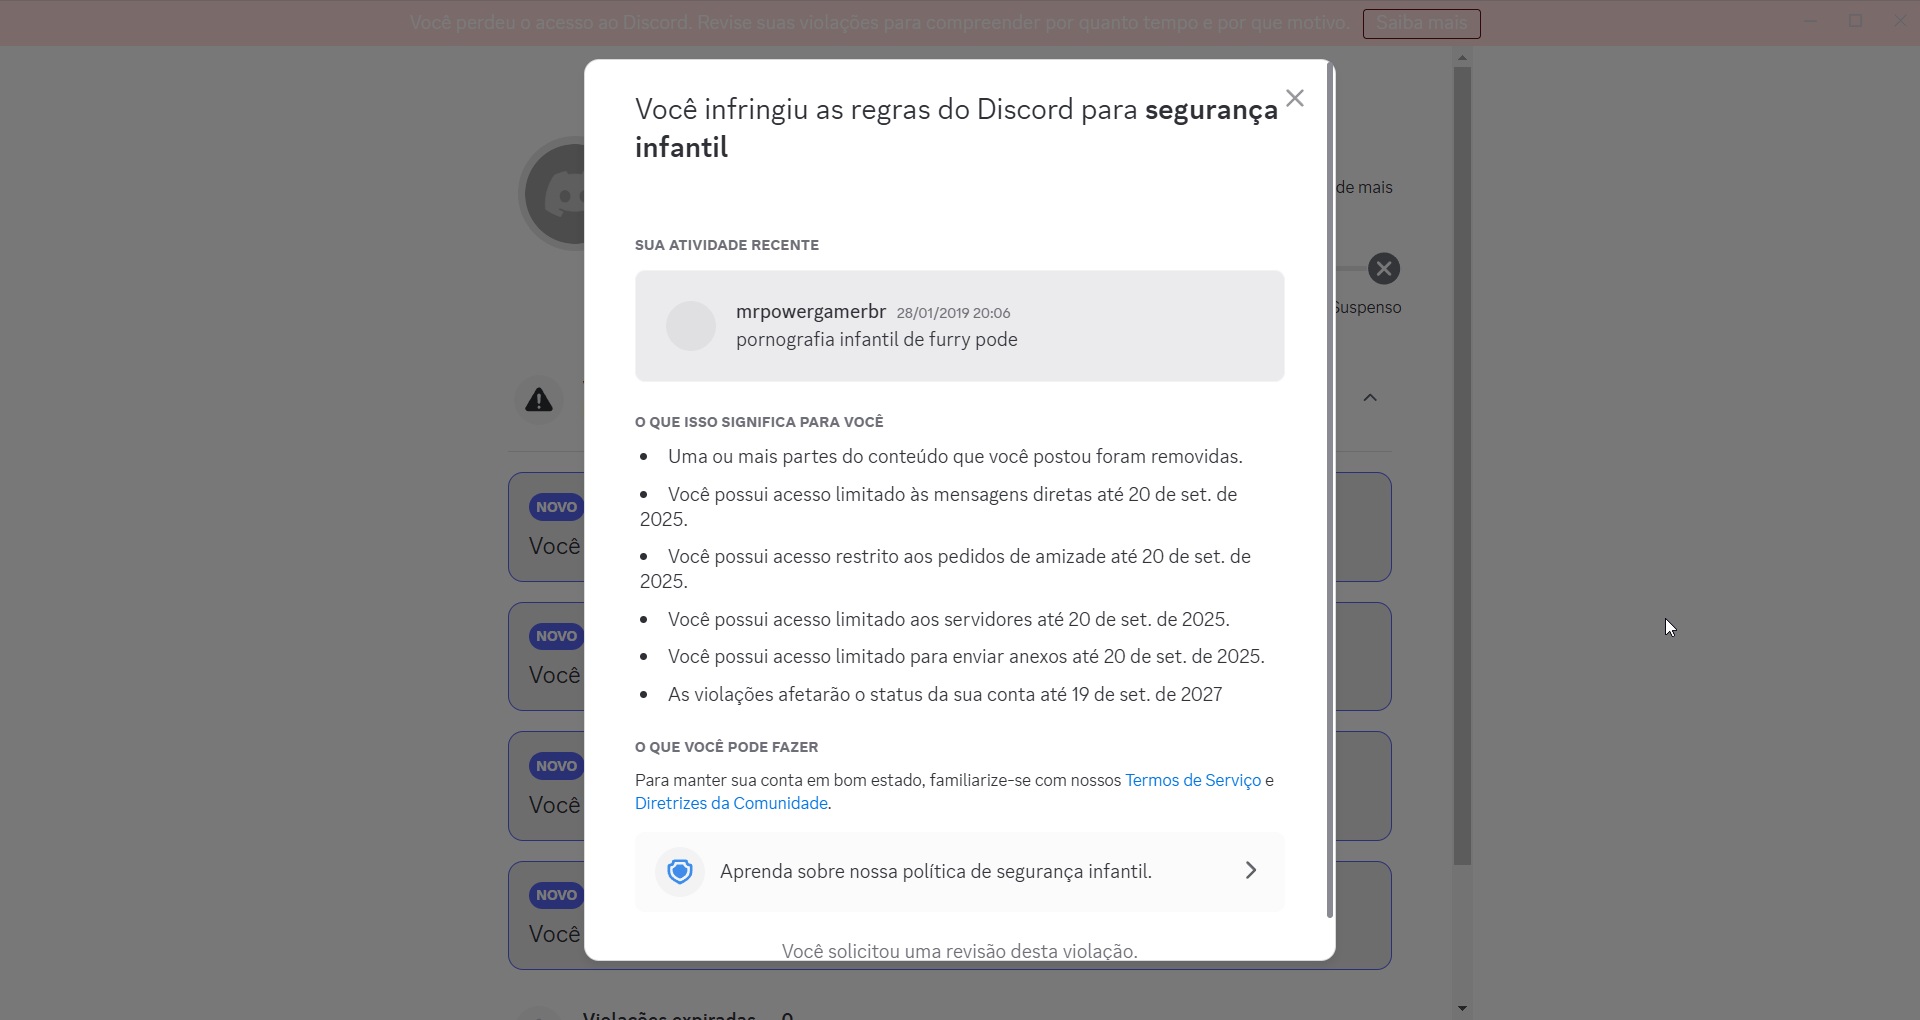
Enquanto algumas provas estão escrito que é "Até dia 20", tem uma prova que não tem tempo limite, que é justamente a que está marcada como "Conta permanentemente suspensa".
A primeira mensagem eu estava comentando sobre o ban de uma pessoa, que o cara tinha falado "Vou enviar foto da rola" e eu comentei que o motivo dela deveria ser "Querer compartilhar foto de pornografia infantil", tanto que a "Beauty Blossom" (DanielaGC_) era da equipe da Loritta, por isso que eu estava comentando com ela.
As duas últimas mensagens (não, eu não enviei errado e nem você viu errado, o Discord me puniu duas vezes pela mesma mensagem) são relacionadas com um fato que aconteceu em 2019, que o Discord deixava enviar pornografia infantil de furry (cub) no Discord. Eu estava comentando na época que isso era uma regra extremamente tosca já que, se lolicon/shotacon é proibido no Discord, nada mais justo que cub porn também ser. Isso dai era em 2019, e essa regra foi alterada a muito tempo atrás. Como isso era um assunto quente na época, estavamos discutindo sobre isso no chat. Uma pessoa falou que o Discord não permitia clients modificados e isso era meio paia, e aí eu respondi com "mas pornografia infantil de furry pode", brincando e zoando o fato que modificar o client é proibido, mas que compartilhar esse tipo de conteúdo é (era) permitido.
E tem uma mensagem que foi denunciado e não tem nenhuma prova associada então como eu vou me defender disso? Ela só fala que o ban foi permanente. (Eu suponho que eles fizeram assim pois como foi 3 motivos "graves", eles colocam outro para mostrar "olha cara foi banido mesmo hein")
Se você não acredita nestas explicações, você pode ver o contexto das duas aqui (precisa estar no Servidor da Loritta). As mensagens em si foram deletadas pelo Discord, mas você pode ver todas as mensagens em volta delas:
Mas por causa de destas mensagens que eu enviei em 2019/2020, a minha conta foi suspensa permanentemente. Por isso eu estou aqui pedindo para que, se alguém tem contato com a equipe de termos e serviço do Discord, possa enviar este pedido para eles. (ID do Ticket no Suporte do Discord: #60512111)
ID da minha conta: 123170274651668480
Se eu confiasse na moderação do Discord, eu não estaria pedindo isso. Mas infelizmente eu conheço como é a moderação deles.
Tente mencionar o Discord no Twitter, junto com o link deste post e o ID do ticket (#60512111).
Infelizmente eu mesmo já tentei abrir tickets fazendo apelo, mas até agora a única resposta foi a do Clyde (bot automático) respondendo que o ban é temporário MESMO QUE NÃO SEJA TEMPORÁRIO.
https://x.com/MrPowerGamerBR/status/1968976637170479317
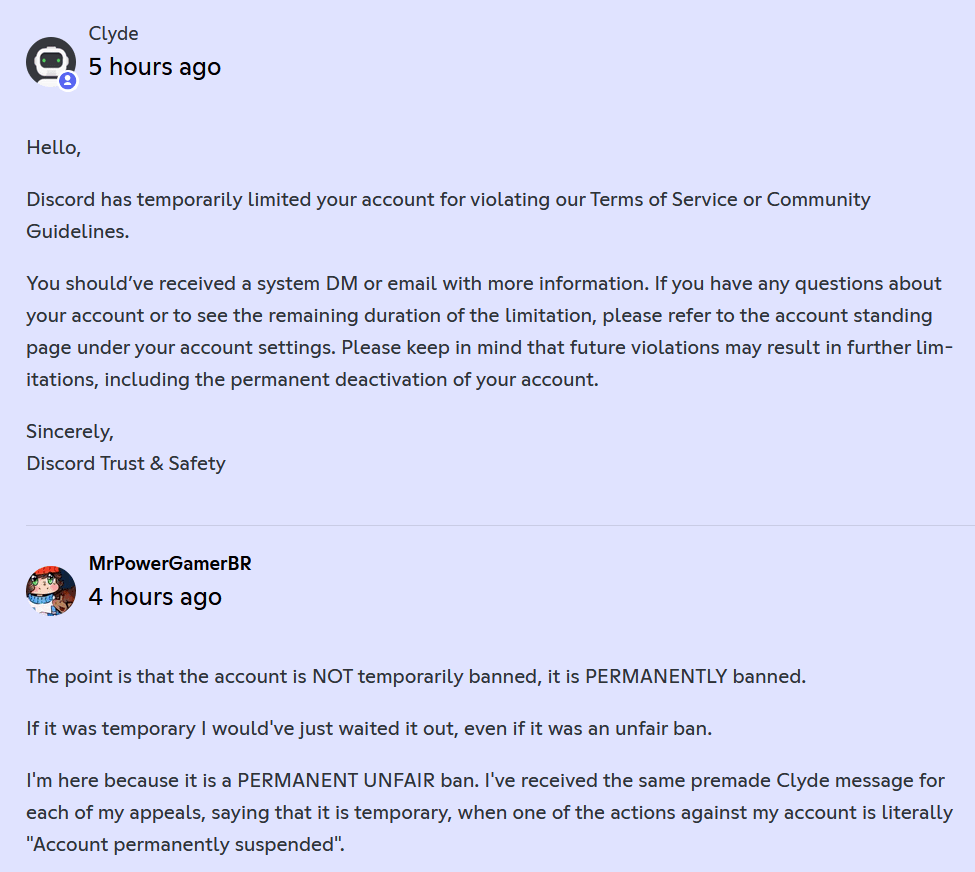
E sirva isto de lição para qualquer outra pessoa que usa o Discord: Você pode ser denunciado por mensagens fora de contexto a qualquer momento. Delete qualquer mensagem sua que possa ser usada contra você.
Não fiquem preocupados com a taxa diária da Loritta ou da afinidade de casamentos, eu pausei elas enquanto o problema não é resolvido.

Este conteúdo não está disponível na sua linguagem... Então se você não entende a linguagem... bem, você pelo ou menos pode apreciar as imagens da postagem, né?
I have been dabbling with Linux and, as a Kotlin developer, it surprised me how fast compiling Kotlin on Linux is compared to Windows. At the same time, I heard about the Windows 11 Dev Drive which, supposedly, is faster than NTFS for software development. Microsoft says that Dev Drive is faster because it uses ReFS and because Microsoft Defender's Antivirus defaults to "performance mode".
So I've decided to build a Kotlin project that uses Kotlin/JVM and Kotlin/JS using ./gradlew clean build:
And the results are...
I don't know how Dev Drive can be this slow, considering that Microsoft is targeting developers with this feature! My Dev Drive is even set up to use a partition for itself on my main NVMe SSD disk instead of using a virtual hard drive to try to extract the "maximum performance", and even then the performance is worse than NTFS.
But all hope is not lost, because Microsoft advertisement about the Dev Drive may not be 100% truthful. You can extract more performance from the Dev Drive by adding the entire disk as a exclusion in Windows Defender.
Isn't that incredibly stupid? After all, wasn't THE POINT of the Dev Drive to not need to worry about anti-virus and things like that? Oh well, after figuring that out, I've also learned that you can disable Windows Defender's filter entirely on all dev drives by using fsutil devdrv enable /disallowAv, which is cleaner than adding the entire disk to Windows Defender.
After doing that, here are the new results:
disallowAv): 22sDon't forget that you need to change the GRADLE_USER_HOME to the Dev Drive, and I think you can go even further beyond by installing IntelliJ IDEA on the Dev Drive too.
While WSL2 has somewhat similar performance to Linux, IntelliJ IDEA does not seem to play well with projects hosted on a WSL2 drive if the project uses Kotlin Multiplatform, complaining about Not a valid absolute path related to KMP dependencies. (probably could be fixed by changing the .kotlin folder)
Como um desenvolvedor de software que também é criador de conteúdo, eu sempre sonhei com o Linux no Desktop™. Mas era apenas um sonho, pois eu não tinha nenhum problema grande com o Windows 11, e eu uso o Windows desde o Windows 98 SE. Mesmo usando Linux em servidores a mais de 10 anos, eu só usei Linux no desktop muito tempo atrás, quando o Windows 10 era tão pesado em HDDs que era melhor eu usar o Xubuntu no meu Lenovo Ideapad 320.
Mas recentemente eu comecei a ficar mais frustrado com o Windows 11, com coisas como adição do Copilot, todo o problema do Recall (mesmo que agora seja só para computadores ARM com cores de inteligência artificial), a Microsoft deixando mais difícil usar o Windows 11 sem ter uma conta da Microsoft conectada, e o pior de tudo, bugs. Bugs que você não tem onde reportar e nem saber se alguém está vendo ele. Pelo ou menos em aplicativos open source se você tiver um bug nele você pode tentar colocar a mão na massa e resolver o problema ao invés de depender de outras pessoas.
eu estou usando o Windows 11 e eu consegui reproduzir o tal bug do explorer que eu estava falando
— MrPowerGamerBR 💫 (@MrPowerGamerBR) July 22, 2025
esse foi o bug que me fez ficar tão frustrado com o Windows que me fez ter vontade de usar Linux de novo pic.twitter.com/szSXHm6c4w
Enquanto muitas pessoas ficaram inspiradas em migrar para Linux por causa do vídeo do PewDiePie, a semente de migrar para Linux começou a crescer por causa do vídeo do James Lee.
Se ele, um animador que trabalho com isso a anos e faz vídeos com um estilo extremamente único conseguiu migrar para Linux, qual seria então a minha desculpa? Alguém que passa a maior parte do dia programando no IntelliJ IDEA (que, pasme, tem versão nativa para Linux)
Então eu decidi ✨ oficialmente ✨ migrar Linux no Desktop.
fiquei com vontade de migrar para linux de novo e olha no que deu
— MrPowerGamerBR 💫 (@MrPowerGamerBR) July 16, 2025
no próximo episódio iremos descobrir se power realmente irá abandonar Windows de uma vez por todas ou se ele irá voltar implorando para o 🅱️ill gates acolher ele de volta pic.twitter.com/p6gdWzMEok
Eu ainda tenho o Windows 11 instalado em dual boot para aplicativos que apenas funcionam no Windows, como VALORANT, Photoshop e outros (Queria ter outra GPU para fazer passthrough só para usar esses apps em uma VM). Mas o meu objetivo é tentar usar ao máximo o Linux.
Será que eu irei ficar no Linux, ou será que eu irei voltar de joelhos implorando para o Bill Gates de volta?
bill gates rn (i am reinstalling windows 11) pic.twitter.com/g3g62pL1Lc
— f4mi ‼️ (@f4micom) November 28, 2024
(Inclusive uma parte legal é que eu consigo acessar os meus servidores usando SFTP diretamente pelo Dolphin (o Windows Explorer do KDE Plasma), algo que o Windows até hoje não tem!)
Alguns dias atrás um amigo meu mostrou um vídeo chamado "Não Use Docker Compose em Produção! Eis o Porquê" do Erick Wendel que o YouTube recomendou. Eu uso Docker Compose em produção a mais de QUATRO ANOS, hospedando algumas aplicações que possuem mais de dois milhões de acessos mensalmente, e achei que o vídeo foca em coisas que são balelas com uma pitada de fearmongering (fomentador de medo), parecendo que o objetivo do vídeo foi apenas para vender cursos sobre Kubernetes.
No vídeo é recomendado usar Kubernetes, e bem, eu já usei usei k3s, e as vantagens que você ganha rodando k3s nas suas máquinas são pequenas comparadas com a dor de cabeça que você tem de manter o k3s na máquina. Já gastei horas tentando debugar problemas em minhas aplicações sendo que, no final, era problema no k3s. Exemplos incluem Diferenças entre o kubectl do k3s e o Kubernetes upstream e que, se você fizer bind de um serviço na porta 10010, você não conseguirá mais dar attach em serviços hospedados no k3s, e essa porta não é documentada em nenhum lugar.
Usar Kubernetes gerenciado pela AWS/GCP/Azure te tira essas dores de cabeça, mas você vai recomendar AWS/GCP/Azure para uma pessoa que está começando no ramo de empreendedorismo? Ela vai gastar muito mais dinheiro com empresas cloud ao invés de comprar uma VPS/máquina dedicada em uma hospedagem como a OVHcloud ou Hetzner! Para iniciantes, é melhor usar Compose e a pessoa descobrir o que ela precisava para a aplicação dela ao longo do tempo, e não colocar Kubernetes direto e ela ter um monte de coisa que, para ela, é desnecessária e pode até atrapalhar a aplicação dela.

Você deve ter notado que este guia foi postado em pleno século 2024, mesmo que o Motorola One (também conhecido como "motorola one", "moto one", deen ou XT1941) tenha sido lançado no final de 2018... melhor tarde do que nunca!
Resolvi fazer isto pois recentemente eu usei o meu Moto G Turbo (merlin) para fazer dump dos meus TOTP do Authy, já que o Authy decidiu parar de suportar o app de desktop do Authy, e, por isso, eu tive vontade de desbloquear o bootloader e fazer traquinagens com o meu Motorola One.
Para contextualizar: Eu tenho o meu Motorola One desde o final de 2019, comprei ele pois o meu estágio exigia que a gente tivesse um celular para a empresa e, enquanto o meu Moto G Turbo ainda atendia as minhas necessidades, a bateria dele já estava indo de comes e bebes.
Como era um celular da empresa, eu tive que instalar todas aquelas travessuras que empresas gostam, como o tal do "Portal da Empresa" da Microsoft, e como o celular era "administrado" pela empresa, eu não podia nem atrever em fazer root nele.
Eu também tive um problema grave de lentidão com este celular, ele era lento mas ao ponto de ser inutilizável, coisa de "eu clico para abrir o teclado e leva uns 30 segundos para realmente abrir", o que era estranho pois enquanto o meu Moto G Turbo era lento, ele nunca era lento ao ponto de ficar não responsivo. Então eu sempre tive a curiosidade de saber se formatar o celular deixaria ele "bom" de novo. Eu não vou usar ele no meu dia-a-dia, mas se ele deixasse de ficar tão travado, eu pelo ou menos conseguiria usar ele para outras coisas.
Então decidi ir atrás disso... e aí eu me deparei com uma situação deplorável: Tem praticamente nada sobre modding dele na internet! Na época eu achava que o meu Moto G Turbo estava em uma situação difícil por ter sido apenas uma revisão do Moto G³ (2015) (osprey) que foi "mal amada" por ter sido lançada em algumas regiões, então a comunidade de modding dele era bem menor.
Mas pelo ou menos o Moto G Turbo tem TWRP oficial e já teve builds oficiais do LineageOS! Infelizmente o Motorola One não teve o mesmo luxo...
 <Pantufa> Mas eu vi aqui e tem builds oficiais do TWRP para o Motorola One!
Não se engane! Existem outros celulares que também possuem a marca "Motorola One" (Motorola One Action (troika), Motorola One Vision (kane), Motorola One Zoom (parker)), e estes outros celulares possuem mais guias e recursos sobre modding para eles.
O Motorola One que estamos falando é o Motorola One, codenome deen, modelo XT1941, e ele parece ser um coitadinho esquecido pela comunidade, pois são poucos os guias que falam sobre como modificar ele.
E por isso eu decidi fazer o meu próprio guia.
* I'm not responsible for bricked devices, dead SD cards, thermonuclear war, or you getting fired because the alarm app failed (like it did for me...).
* YOU are choosing to make these modifications, and if you point the finger at me for messing up your device, I will laugh at you.
* Your warranty will be void if you tamper with any part of your device / software.
Neste guia, eu vou mostrar o que eu normalmente espero quando eu penso sobre "modificar o celular", ou seja:
Eu escrevi o guia como se este não fosse o seu primeiro rodeio na parte de modificação de celulares, mas ao mesmo tempo tentei deixar claro ao ponto de não ter dúvidas, deixando as dúvidas que restam algo que você consiga descobrir sozinho. Mas se tiver alguma dúvida, basta perguntar!

Este conteúdo não está disponível na sua linguagem... Então se você não entende a linguagem... bem, você pelo ou menos pode apreciar as imagens da postagem, né?
By default, LXD Virtual Machines do not preallocate their memory up to the limits.memory set. Instead, they allocate up to the maximum memory has needed during its lifetime, but they do not give back memory to the host system after it is freed, ballooning devices notwithstanding.
So, because the memory isn't given back to the host, why not preallocate the memory used by the VM? This way it is easier to reason about if you have enough memory in your system, instead of trying to think about "uuhh I do have 10240 megabytes free, but one of my VMs has a 6144 megabytes limit, and currently they are using 2048 megabytes, so actually we have 6144 megabytes free".
First, you need to shutdown your virtual machine...
lxc stop test-memoryalloc
Now, if you haven't already, let's set the memory limit for the virtual machine...
lxc config set test-memoryalloc limits.memory 8GB
And then we add QEMU's -mem-prealloc parameter to the VM!
lxc config set test-memoryalloc raw.qemu "\-mem-prealloc"
That's it! If you check how much memory the QEMU process for the test-memoryalloc virtual machine is using, you'll see that it will be using ~8GB.
And yes, you need to add the \ before the dash, because if you don't, LXD will complain about Error: unknown shorthand flag: 'm' in -mem-prealloc.
If you want to remove the -mem-prealloc parameter, you can remove it by using lxc config unset.
lxc config unset test-memoryalloc raw.qemu

Este conteúdo não está disponível na sua linguagem... Então se você não entende a linguagem... bem, você pelo ou menos pode apreciar as imagens da postagem, né?

During a "let's improve SparklyPower to make it the best Survival server ever" hyperfixation phase, I've really wanted to update my server to 1.21. I waited eagerly for the shiny Paper experimental 1.21 builds, to update my server right when it is released. Who cares if it is "experimental", after all, what could possibly go wrong?
Well, that was a big mistake.
When the Paper team said that they are experimental builds that you shouldn't run in production, they mean it. The Paper experimental 1.21 builds do not have all of the optimization patches, nor they are stable. But I'm stupid and decided to ignore the experimental label.

Now I'm stuck with a server that could handle ~80 players with 20 TPS on 1.20.6, while on 1.21 it is struggling to keep 20 TPS with only 50 players online. And that makes me sad because it is hard to just shrug it off and carry on when you know that players are sad/angry because the server is lagging, especially because it was entirely my fault. 
 <Pantufa> Isn't the solution straightforward? Why not just downgrade the server to 1.20.6 and move on?
Here's the deal: Everyone says that downgrading versions is NOT supported, some even say that it is IMPOSSIBLE to downgrade and that's why you MUST backup your server before updating.